Deep Dive into SAP Table Buffering: Single vs. Full vs. Generic Area Buffering, Practical Implementation, and Lock Objects
Welcome back everyone, so basically we were discussing about Single Record buffering and we had discussed that in single record buffering at a time, only single record will pass.
Full Record Buffering :-
- In case of full buffering, full table records load into the buffer at a time.
- When to use :- Tables that are best suited to full buffering are frequently accessed and rarely changed. A table which stores transaction data should not be opted for full buffering.
- Advantage :- There is a significantly reduction in number of database access.
- Disadvantage :- This type of buffering requires more memory on application layer.
Practical Implementation of Full Record Buffering :-
-
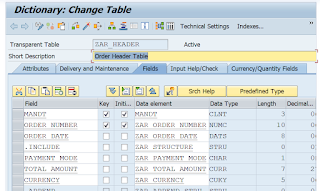
Step 1 :- Open our order header table in change mode.
-
Step 2 :- Go to technical settings, and select fully buffered → activate the table.
-
Step 3 :- At this moment, if you go to transaction code al12 and open the buffer.
-
Step 4 :- you will see nothing will be in the buffer.
-
Step 5 :- Open the ABAP editor (SE38) and execute the program which we have used in previous blog.
-
Step 6 :- execute the above program and enter a value of order number on selection screen.
-
Step 7 :- As soon as we enter some value in order number and press F8 → this input will go to database layer and fetch details and order number 1 details will come on application layer. But Since we have selected full buffered, therefore full records will come into the buffer. So, to check that
-
Step 8 :- Go to Transaction code al12 and follow the below steps.
-
Step 9 :- As soon as, we will press the continue button, we will see that entire data will be available in the buffer.
- So basically, it does not matter whether we are loading a single data or multiple. It is because we have selected fully buffered, therefore even we will load single data, All the data will be loaded into the buffer.
Note :- If we are changing some data in the table through SM30, then SAP will automatically refresh the buffer and entire data will be removed from the buffer.
Generic area Buffering :-
- In case of generic area buffering, the records matches the generic key are loaded in the buffer.
- When to use : For generic areas like - language dependent tables.
- In case of generic area buffering we need to pass the number of key fields.
- The number of key field for a generic area buffering is less than the primary keys of the table.
Important Points for Table Buffering :-
- Whenever, we want to stop the buffering of a table, choose the radio button buffering allowed but switched off rather than buffering not allowed.
- Never use the transaction code/ $TAB to reset the buffer of specific tables, as this transaction code reset the buffer of all the tables. Pass the specific table in al12 transaction code to reset the buffer. (Edit - Reset Buffer - Table Buffer ).
Transaction Codes for Table Buffering :-
- Transaction code to check the table buffer : al12 (Monitor-Buffers-Table Buffer)
- The transaction code to reset the table buffer : /$TAB
Lock Objects :-
- The purpose of lock objects is to achieve synchronization.
- If multiple users want to change the same data at the same time, then at a time only ne user can change the data.
- Lock objects name starts with prefix ‘E’.
- When we want to create customized lock objects, the name must start with EZ or EY.
- The transaction code to see the lock entries is SM12.
-
You can go SM12 and check → the lock entries.
-
Lock Modes :-
- There are 3 lock modes :-
-
Read lock
-
Write lock
-
Enhanced write lock
Read Lock :-
- Read lock is also called as shared lock.
- The default value of read lock is ‘S’.
- In case of read lock, others users can display the data, but they can not change the data.
Write Lock :-
- Write lock is also called as exclusive lock.
- The default value of write lock is ‘E’.
- In case of write lock - other users can not display and change the data.
- Write lock can be requested several times from the same transaction and are processed successively.
Enhanced Write Lock :-
- Enhanced Write lock is also called as exclusive lock without cumulation.
- The default value of write lock is ‘X’.
- In case of enhanced write lock - other users can not display and change the data. Additionally, it protects the further access of the same transaction.
- Enhanced Write lock can be requested only once from the same transaction and can not be processed successively.
So that’s enough for today, we will continue with the transaction codes in the next blog.
Thanx for being a part of this wonderful journey.


.png)

.png)
Comments
Post a Comment