Exploring SAP: Leveraging Help Views in Search Helps and Unraveling the Mysteries of Table Buffering
Welcome back everyone, So basically we have discussed Search helps in the last blog, So let’s continue
How to use Help view in Search help?
→ If you remember, when we were discussing about help view, I had told that we will use it in Search help.
-
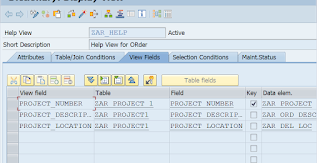
So, this is our help view which we had created in our previous blogs.
-
Step 1 :- Go to SE11, select the search help radio button and give a name and press enter.
-
Step 2 :- select elementary search help and press enter.
-
Step 3 :- provide a short description.
-
Step 4 :- In selection method, we will write the name of our help view → and we will choose our search help parameters.
-
Step 5 :- Save and activate our search help.
-
Step 6 :- Now, we can execute our search help with F8 and you will see it is displaying the contents, In help view we were unable to display the contents but we can display them by using them in search helps.
- So, this is enough for search helps and now we will start Table Buffering.
Table Buffering :-
-
Buffer is a temporary storage on the application layer.
let’s take a real time example :-
Example :- Suppose we are watching a movie and the movie is buffered and somehow, we pause the movie in the middle because of some reason but since the movie is buffered we can start it right from the place when it was stopped, but if the movie is not buffered, we will have to start it from beginning only.
-
It improves the performance when accessing the data records contained in the table.
-
Sometimes, we need to access a particular set of records more frequently than others.
-
Accessing records directly from a database table can be very time consuming.
-
To overcome this drawback, the frequently accessed records of a table can be placed in a buffer from which they can be accessed easily.
Now, open our order header table from SE11 and go to technical settings.
- Previously, during creating above table we have only provided Data class and size category.
- Now we can see that buffering is a part of technical settings of the table.
The various buffering options are as follows :-
- Buffering not allowed :- Table buffering is not performed for the table.
- Buffering switched on :- Table buffering is performed for the table.
- Buffering allowed, but switched off :- Buffer is allowed but it is switched off and can be switched on anytime according to the requirement of customer.
Note :- you can go to change mode of the table and select any of the buffering options according to your requirements.
Types of Buffering :-
- There are three types of table buffering :-
- Single Record Buffering
- Full Buffering
- Generic area buffering
1. Single Record Buffering :-
- In case of single record buffering, single records loads in the buffer at a time.
- When to use, Single records buffering should be used for tables where single records are accessed by specifying the complete key.
- Advantage :- This type of buffering requires less memory on application layer.
- Disadvantage :- There is not significant reduction in number of database access.
How to check buffers ?
-
Step 1 :- go to al12 transaction code.
-
step 2 :- follow the below steps.
-
Step 3 :- Provide the table name
-
Step 4 :- Press enter.
- Since, we have not selected any buffered type in out table, here we will see a popup that Table is not buffered.
-
Step 5 :- Now , I open the table in change mode and enabled the buffer.
-
Step 6 :- Save the technical settings and activate our table.
-
Step 7 :- Now go to transaction code al12 and provide our order header table name, as soon as we press enter a empty screen will appear because, we have enabled buffer but after enabling buffer we don’t load any data into it.
How to add data into buffers ?
-
We will have to execute our table in Se38.
-
Suppose this is my report, where I have used my order header table to display the data.
- For now, no need to worry about the report just focus on buffer, we will have a complete series on reports soon.
-
Activate the report and press F8.
-
Suppose, I have given order_number as 1 and press F8, a list will appear with three fields which we have selected in our report.
-
Now, kindly go al12 transaction code and as soon as you will enter the table name and press enter, you will see a line of data in buffer.
-
To check what data is press in it, press back and follow the below steps.
-
Click on buffer content.
-
In table give our table name and click on continue.
-
We will see the same data in buffer as we have seen after executing our report.
So, that’s enough for today.
We will discuss full record buffering in next blog.
Thanx for being a part of this journey.


.png)
.png)

Comments
Post a Comment